Filters
Click Filters in the toolbar to open the Filtering window. It sets a high-pass filter, a low-pass filter and a notch filter for each type of channel, and applies them to what the views display.
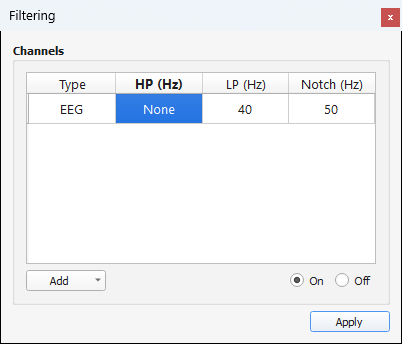
The window has one row for each type of channel found in the recording (here, EEG):
| Column | Meaning |
|---|---|
| HP (Hz) | High-pass frequency: slower activity than this is removed (it cuts the slow drifts). |
| LP (Hz) | Low-pass frequency: faster activity than this is removed (it cuts muscle noise). |
| Notch (Hz) | Notch frequency: removes one frequency, typically the 50 Hz or 60 Hz of the mains. |
None means that the filter is not applied.
Set the filters
- Double-click the cell of the filter you want, and type the frequency in hertz.
- Click Apply. The views are redrawn with the filtered signal.
The On and Off buttons, at the bottom right, turn the filtering on and off without losing your values: choose Off and click Apply to look at the signal without any filter, then On and Apply to get your filters back. It is the quick way to compare the signal before and after.
A frequency shown on a red background asks for more than the recording contains: a high-pass lower, or a low-pass higher, than the filters that were applied when the signal was recorded.
Other types of channels
AnyWave lists the types that it found in the recording. If you need a filter for a type that is not in the list, for instance after changing the type of a channel in the montage editor, click Add and choose the type.
Good to know
- The filters change what you see. They never modify the recording file. The Export Data process lets you choose whether the exported signal is filtered or not.
- The settings are saved with the recording, in a
.fltfile next to it (in your own folder of the database for a BIDS recording). They are applied again the next time you open the same recording.